前言
版本:Vuex 4.1.0
本文我们来研究Vuex内部原理
带着如下问题去看源码:
- store对象怎么被注入到Vue实例中的?
- 模块化怎么实现的?为什么在模块中调用mutations中取到的state是模块内部的?
- Vuex内部是怎么区分用户是通过mutations修改state,还是手动修改state?
- mapState等辅助函数是怎么实现的?
store对象怎么被注入到Vue实例中的?
首先,回顾下在Vue中使用Vuex的方式
import { createApp } from 'vue'
import { createStore } from 'vuex'

const moduleA = {
  state () {
    return {
      count: 0
    }
  },
  mutations: {
    increment (state) {
      state.count++
    }
  }
}

const moduleB = {
  state () {
    return {
      count: 0
    }
  },
  mutations: {
    increment (state) {
      state.count++
    }
  }
}

// 创建一个新的 store 实例
const store = createStore({
  modules: {
    a: moduleA,
    b: moduleB
  },
  state () {
    return {
      count: 0
    }
  },
  mutations: {
    increment (state) {
      state.count++
    }
  }
})

const app = createApp({ /* 根组件 */ })

// 将 store 实例作为插件安装
app.use(store)
我们可以看到,刚开始通过createStore传入配置返回store,之后再通过app.use(store)将store作为插件安装到Vue实例中
我们先看createStore的实现。其实就是返回一个Store实例
src/store.js
export function createStore(options) {
  return new Store(options);
}
那么我们通过use调用将store传入其中,其实本质就是调用Store中的install方法
src/store.js
export class Store {
  install(app, injectKey) {
    app.provide(injectKey || storeKey, this);
    app.config.globalProperties.$store = this;

    const useDevtools =
      this._devtools !== undefined
        ? this._devtools
        : __DEV__ || __VUE_PROD_DEVTOOLS__;

    if (useDevtools) {
      addDevtools(app, this);
    }
  }
}
在install内部我们重点关注app.config.globalProperties.$store,这里就是将我们创建的Store实例绑定到了Vue实例的$store上
模块化怎么实现的?为什么在模块中调用mutations中取到的state是模块内部的?
我们回到调用createStore的地方,刚开始new了Store实例,那么就会调用Store的构造方法
class Store {
  constructor(options = {}) {
    if (__DEV__) {
      assert(
        typeof Promise !== 'undefined',
        `vuex requires a Promise polyfill in this browser.`
      );
      assert(
        this instanceof Store,
        `store must be called with the new operator.`
      );
    }

    const { plugins = [], strict = false, devtools } = options;

    // store internal state
    this._committing = false;
    this._actions = Object.create(null);
    this._actionSubscribers = [];
    this._mutations = Object.create(null);
    this._wrappedGetters = Object.create(null);
    // 注册module
    this._modules = new ModuleCollection(options);

    this._modulesNamespaceMap = Object.create(null);
    this._subscribers = [];
    this._makeLocalGettersCache = Object.create(null);

    // EffectScope instance. when registering new getters, we wrap them inside
    // EffectScope so that getters (computed) would not be destroyed on
    // component unmount.
    this._scope = null;

    this._devtools = devtools;

    // bind commit and dispatch to self
    // 重写commit、dispatch,绑定this
    const store = this;
    const { dispatch, commit } = this;
    this.dispatch = function boundDispatch(type, payload) {
      return dispatch.call(store, type, payload);
    };
    this.commit = function boundCommit(type, payload, options) {
      return commit.call(store, type, payload, options);
    };

    // strict mode
    this.strict = strict;

    // 拿root state
    const state = this._modules.root.state;

    // 初始化root module
    // init root module.
    // this also recursively registers all sub-modules
    // and collects all module getters inside this._wrappedGetters
    installModule(this, state, [], this._modules.root);

    // initialize the store state, which is responsible for the reactivity
    // (also registers _wrappedGetters as computed properties)
    resetStoreState(this, state);

    // apply plugins
    plugins.forEach((plugin) => plugin(this));
  }
}
重点看this._modules = new ModuleCollection(options)
src/module/module-collection.js
export default class ModuleCollection {
  constructor (rawRootModule) {
    // register root module (Vuex.Store options)
    this.register([], rawRootModule, false)
  }

  register (path, rawModule, runtime = true) {
    if (__DEV__) {
      assertRawModule(path, rawModule)
    }

    const newModule = new Module(rawModule, runtime)
    if (path.length === 0) {
      this.root = newModule
    } else {
      const parent = this.get(path.slice(0, -1))
      parent.addChild(path[path.length - 1], newModule)
    }

    // register nested modules
    if (rawModule.modules) {
      forEachValue(rawModule.modules, (rawChildModule, key) => {
        this.register(path.concat(key), rawChildModule, runtime)
      })
    }
  }
}
ModuleCollection初始化会调用register,然后在register中path.length = 0。因为我们传入的是根module,所以会将根module赋值给this.root。如果root module有modules,那么就会递归调用register,将子module也注册到this.root中。 模块的区分主要是根据path数组来的,如果path.length = 0,那么就是根module,否则就是子module。
store._modules如下,是根据模块的关系构建的树状结构 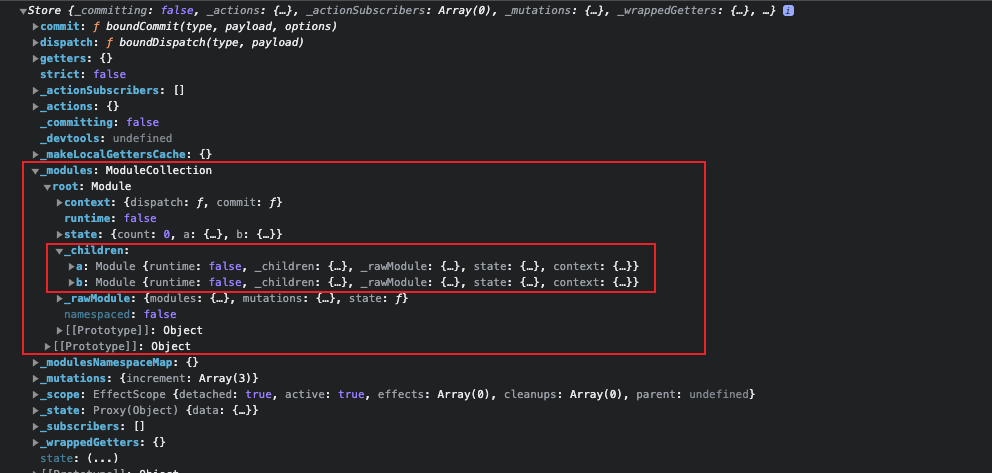
到这,我们有模块结构有了初步的认识,也明白了模块是如何构建起来的。
回到Store初始化部分,其中调用了installModule方法,这个方法主要是将模块的state、getters、mutations、actions等注册到store中
src/store-util.js
export function installModule(store, rootState, path, module, hot) {
  const isRoot = !path.length;
  const namespace = store._modules.getNamespace(path);

  // register in namespace map
  if (module.namespaced) {
    if (store._modulesNamespaceMap[namespace] && __DEV__) {
      console.error(
        `[vuex] duplicate namespace ${namespace} for the namespaced module ${path.join(
          '/'
        )}`
      );
    }
    store._modulesNamespaceMap[namespace] = module;
  }

  // set state
  if (!isRoot && !hot) {
    const parentState = getNestedState(rootState, path.slice(0, -1));
    const moduleName = path[path.length - 1];
    store._withCommit(() => {
      if (__DEV__) {
        if (moduleName in parentState) {
          console.warn(
            `[vuex] state field "${moduleName}" was overridden by a module with the same name at "${path.join(
              '.'
            )}"`
          );
        }
      }
      parentState[moduleName] = module.state;
    });
  }

  const local = (module.context = makeLocalContext(store, namespace, path));

  // 注册mutation
  module.forEachMutation((mutation, key) => {
    const namespacedType = namespace + key;
    registerMutation(store, namespacedType, mutation, local);
  });

  // 注册action
  module.forEachAction((action, key) => {
    const type = action.root ? key : namespace + key;
    const handler = action.handler || action;
    registerAction(store, type, handler, local);
  });

  // 注册getter
  module.forEachGetter((getter, key) => {
    const namespacedType = namespace + key;
    registerGetter(store, namespacedType, getter, local);
  });

  // 递归初始化子module
  module.forEachChild((child, key) => {
    installModule(store, rootState, path.concat(key), child, hot);
  });
}
因为我们主要是研究mutations,所以我们重点看mutations。 首先关注makeLocalContext,这个方法很重要,它是我们为什么能在模块内部的mutations中拿到模块的state、getters、commit、dispatch的原因。
src/store-util.js
function makeLocalContext(store, namespace, path) {
  const noNamespace = namespace === '';

  const local = {
    dispatch: noNamespace
      ? store.dispatch
      : (_type, _payload, _options) => {
          const args = unifyObjectStyle(_type, _payload, _options);
          const { payload, options } = args;
          let { type } = args;

          if (!options || !options.root) {
            type = namespace + type;
            if (__DEV__ && !store._actions[type]) {
              console.error(
                `[vuex] unknown local action type: ${args.type}, global type: ${type}`
              );
              return;
            }
          }

          return store.dispatch(type, payload);
        },

    commit: noNamespace
      ? store.commit
      : (_type, _payload, _options) => {
          const args = unifyObjectStyle(_type, _payload, _options);
          const { payload, options } = args;
          let { type } = args;

          if (!options || !options.root) {
            type = namespace + type;
            if (__DEV__ && !store._mutations[type]) {
              console.error(
                `[vuex] unknown local mutation type: ${args.type}, global type: ${type}`
              );
              return;
            }
          }

          store.commit(type, payload, options);
        },
  };

  // getters and state object must be gotten lazily
  // because they will be changed by state update
  Object.defineProperties(local, {
    getters: {
      get: noNamespace
        ? () => store.getters
        : () => makeLocalGetters(store, namespace),
    },
    state: {
      get: () => getNestedState(store.state, path),
    },
  });

  return local;
}
从代码中可以发现,其实就是返回了一个local对象,对象内部定义了dispatch、commit、getters、state属性。
之后我们再看调用完makeLocalContext之后开始注册mutations。通过module上的forEachMutation方法去遍历store上的mutations,然后调用registerMutation方法注册mutations。 有个关键点需要注意const namespacedType = namespace + key,这里通过namespace拼接了type。namespace是通过path来确定的,例如如果此时是注册的a模块,那么namespace就是a/,如果是a模块下的b模块,那么namespace就是a/b/,这样就能保证不同模块下的mutations不会冲突。
之前返回的local会在registerMutation函数中作为参数传入
function registerMutation(store, type, handler, local) {
  const entry = store._mutations[type] || (store._mutations[type] = []);
  entry.push(function wrappedMutationHandler(payload) {
    handler.call(store, local.state, payload);
  });
}
registerMutation的代码很简单,就是将我们定义的mutations定义到store._mutations上,而且这里是根据我们之前namespacedType确认的type。这样也就保证不同模块可以同名的mutations不会冲突。
之后往entry去push一个函数,其中调用了handler。这个handler就是用户自定义的mutations,我们关注第二个参数,传入了local.state。这个时候我们会看local中的state是怎么样处理的
Object.defineProperties(local, {
  getters: {
    get: noNamespace
      ? () => store.getters
      : () => makeLocalGetters(store, namespace),
  },
  state: {
    get: () => getNestedState(store.state, path),
  },
});
state定义了get方法,也就是访问的时候会调用getNestedState,之后将这个函数的返回值返回。
export function getNestedState(state, path) {
  return path.reduce((state, key) => state[key], state);
}
getNestedState函数主要作用是通过path的层级取出对应模块的state。例如,我们此时取a模块,那么path其实就是['a'],而state是一个对象首先是根模块,再是子模块。 例如,我们的之前的代码例子的state结构是这样的
{
  count: 0,
  a: {
    count: 0
  },
  b: {
    count: 0
  }
}
那么我们根据path就能取出对应的模块,例如取a模块getNestedState就会把整个a对象返回。于是在我们实际调用mutations的时候,第一个参数就是state,这个时候这个state就是模块内部state,而不是全局state。
Vuex内部是怎么区分用户是通过mutations修改state,还是手动修改state?
我们想要知道这个问题,首先我们应该知道Vuex内部是怎么调用mutations。用户想要通过mutations修改state,会调用store上的commit方法。
class Store {
  constructor(options = {}) {
    this._committing = false;
  }

  commit(_type, _payload, _options) {
    // check object-style commit
    const { type, payload, options } = unifyObjectStyle(
      _type,
      _payload,
      _options
    );

    const mutation = { type, payload };
    const entry = this._mutations[type];
    if (!entry) {
      if (__DEV__) {
        console.error(`[vuex] unknown mutation type: ${type}`);
      }
      return;
    }
    this._withCommit(() => {
      entry.forEach(function commitIterator(handler) {
        handler(payload);
      });
    });

    this._subscribers
      .slice() // shallow copy to prevent iterator invalidation if subscriber synchronously calls unsubscribe
      .forEach((sub) => sub(mutation, this.state));

    if (__DEV__ && options && options.silent) {
      console.warn(
        `[vuex] mutation type: ${type}. Silent option has been removed. ` +
          'Use the filter functionality in the vue-devtools'
      );
    }
  }

  _withCommit(fn) {
    const committing = this._committing;
    this._committing = true;
    fn();
    this._committing = committing;
  }
}
commit方法其实很简单,首先对参数做了处理,之后通过type拿到对应的mutations,然后调用了_withCommit。
_withCommit做的事情就是将_committing置为true,然后调用fn。那么此时entry就会开始遍历,执行entry中的每一个handler,此时就会执行到我们之前分析的注册mutations的那个函数内部定义的函数。
这就是用户通过规范的方式修改state。但是如果直接state.count = 2,这样去修改为什么会产生警告?
在Store初始化过程中,会调用resetStoreState
export function resetStoreState(store, state, hot) {
  const oldState = store._state;
  const oldScope = store._scope;

  // bind store public getters
  store.getters = {};
  // reset local getters cache
  store._makeLocalGettersCache = Object.create(null);
  const wrappedGetters = store._wrappedGetters;
  const computedObj = {};
  const computedCache = {};

  // create a new effect scope and create computed object inside it to avoid
  // getters (computed) getting destroyed on component unmount.
  const scope = effectScope(true);

  scope.run(() => {
    forEachValue(wrappedGetters, (fn, key) => {
      // use computed to leverage its lazy-caching mechanism
      // direct inline function use will lead to closure preserving oldState.
      // using partial to return function with only arguments preserved in closure environment.
      computedObj[key] = partial(fn, store);
      computedCache[key] = computed(() => computedObj[key]());
      Object.defineProperty(store.getters, key, {
        get: () => computedCache[key].value,
        enumerable: true, // for local getters
      });
    });
  });

  store._state = reactive({
    data: state,
  });

  // register the newly created effect scope to the store so that we can
  // dispose the effects when this method runs again in the future.
  store._scope = scope;

  // enable strict mode for new state
  if (store.strict) {
    enableStrictMode(store);
  }

  if (oldState) {
    if (hot) {
      // dispatch changes in all subscribed watchers
      // to force getter re-evaluation for hot reloading.
      store._withCommit(() => {
        oldState.data = null;
      });
    }
  }

  // dispose previously registered effect scope if there is one.
  if (oldScope) {
    oldScope.stop();
  }
}
resetStoreState函数中有一段代码将state变成响应式数据赋值给store._state
之后关注enableStrictMode,这个函数内部监听了state的数据,而且是深度监听。 那么我们如果手动修改,_committing是为false的,那么就会触发警告。但是如果是通过mutations修改,那么_committing就会为true,就不会触发警告。
function enableStrictMode(store) {
  watch(
    () => store._state.data,
    () => {
      if (__DEV__) {
        assert(
          store._committing,
          `do not mutate vuex store state outside mutation handlers.`
        );
      }
    },
    { deep: true, flush: 'sync' }
  );
}
mapState等辅助函数是怎么实现的?
先回顾下mapState的使用
export default {
  data() {
    return {
      localCount: 0
    }
  },
  // ...
  computed: mapState({
    // 箭头函数可使代码更简练
    count: state => state.count,

    // 传字符串参数 'count' 等同于 `state => state.count`
    countAlias: 'count',

    // 为了能够使用 `this` 获取局部状态,必须使用常规函数
    countPlusLocalState (state) {
      return state.count + this.localCount
    }
  })
}
我们重点看mapState的实现,因为其他都是类似。
src/helpers.js
export const mapState = normalizeNamespace((namespace, states) => {
  const res = {}
  if (__DEV__ && !isValidMap(states)) {
    console.error('[vuex] mapState: mapper parameter must be either an Array or an Object')
  }
  normalizeMap(states).forEach(({ key, val }) => {
    res[key] = function mappedState () {
      let state = this.$store.state
      let getters = this.$store.getters
      if (namespace) {
        const module = getModuleByNamespace(this.$store, 'mapState', namespace)
        if (!module) {
          return
        }
        state = module.context.state
        getters = module.context.getters
      }
      return typeof val === 'function'
        ? val.call(this, state, getters)
        : state[val]
    }
    // mark vuex getter for devtools
    res[key].vuex = true
  })
  return res
})

function normalizeNamespace (fn) {
  return (namespace, map) => {
    if (typeof namespace !== 'string') {
      map = namespace
      namespace = ''
    } else if (namespace.charAt(namespace.length - 1) !== '/') {
      namespace += '/'
    }
    return fn(namespace, map)
  }
}

/**
 * Normalize the map
 * normalizeMap([1, 2, 3]) => [ { key: 1, val: 1 }, { key: 2, val: 2 }, { key: 3, val: 3 } ]
 * normalizeMap({a: 1, b: 2, c: 3}) => [ { key: 'a', val: 1 }, { key: 'b', val: 2 }, { key: 'c', val: 3 } ]
 * @param {Array|Object} map
 * @return {Object}
 */
function normalizeMap (map) {
  if (!isValidMap(map)) {
    return []
  }
  return Array.isArray(map)
    ? map.map(key => ({ key, val: key }))
    : Object.keys(map).map(key => ({ key, val: map[key] }))
}
首先mapState是normalizeNamespace函数的返回值。normalizeNamespace函数的作用就是确定namespace。 之后实际调用的还是我们normalizeNamespace中传入的函数。 接着通过normalizeMap,将map规范化。再对map做遍历。把对应的key赋值到res上,值是一个函数,之后再把res返回。
重点看res[key]赋值的函数
res[key] = function mappedState () {
  let state = this.$store.state
  let getters = this.$store.getters
  if (namespace) {
    const module = getModuleByNamespace(this.$store, 'mapState', namespace)
    if (!module) {
      return
    }
    state = module.context.state
    getters = module.context.getters
  }
  return typeof val === 'function'
    ? val.call(this, state, getters)
    : state[val]
}
可以发现,如果我们mapState中传入的val是函数,那么会调用函数再将state和getters传入,这样用户就可以拿到state和getters了。那么最主要就是解决了用户不需要重复书写this.$store.state.xxx这样的代码。如果传入的是字符串,那么就直接从state中取值返回。
总结
通过这次源码分析,我们已经可以回答前面的问题了
- store对象怎么被注入到Vue实例中的? 通过Store中的install注入
- 模块化怎么实现的?为什么在模块中调用mutations中取到的state是模块内部的?
- 模块化的重点是ModuleCollection,通过递归的方法将模块的state,mutations,actions,getters都放到了一个对象中并且每一个都是树形结构,然后通过path来区分模块。
- 我们能在模块内部取到对应自己模块的东西,要感谢makeLocalContext这个函数,对模块的上下文进行了处理
- Vuex内部是怎么区分用户是通过mutations修改state,还是手动修改state?
- Vuex内部更改会将_committing置为true,但是用户自己更改不会将_committing置为true,所以通过_committing就可以区分
- mapState等辅助函数是怎么实现的?
- mapState等辅助函数主要是通过内部包了多层函数来处理,最终返回一个函数,这个函数会根据用户传入的参数来返回对应的值。